Firstly, if you find it troublesome to build your own system, you can easily use the official solution .Just Click here
Today, I’d like to share how to set up an MCP server using Cherry Studio to facilitate quick and convenient access to large models. Through the detailed introduction in this article, even if you are new to MCP and Cherry Studio, you can easily grasp the operation methods and quickly implement your own AI automation services
What is an MCP server?
MCP (Model Communication Protocol) is a standard interface protocol specifically designed for the interaction between large language models and external services. In simple terms, MCP serves as a bridge for communication between large language models and external software
In the past, when we used large language models, we often had to rely on single invocations and lacked the flexibility to expand. Now, with MCP, a single configuration is all that’s needed to enable large language models to easily interact with any external workflow, API, or application, facilitating automated execution in complex business scenarios
For example, if you want to build an AI image automatic generation process, MCP can easily connect your large model with the n8n workflow, allowing the model to directly obtain parameters from n8n and return generated results
What is Cherry Studio?
Cherry Studio is a minimalist yet powerful interactive platform for large models. It enables users to configure and utilize various AI model services through a simple graphical interface, without requiring any programming
It has built-in MCP support, which means you can not only quickly access various AI services, but also easily integrate your own MCP server to achieve more advanced automation processes
Cherry Studio makes complex technical implementations simple and understandable, lowering the threshold for the application of large model technology. Even if you don’t know how to write code, you can quickly build personalized AI services
What value can MCP+Cherry Studio achieve?
When the MCP server is combined with Cherry Studio, the following values can be achieved:
- Lower threshold: No need to write complex code, graphical interface configuration can complete efficient large model invocation
- Rapid integration: Supports the rapid integration of any workflow and third-party services, reducing redundant development
- Flexible expansion: One-time setup allows for unlimited repeated use, greatly enhancing business flexibility
- Cost reduction: Eliminate the complex service deployment and maintenance costs, allowing for a stronger focus on the business logic itself
Next, I will guide you step-by-step on how to configure the MCP server in Cherry Studio
Which MCP mode should be used in n8n?
MCP (Model Communication Protocol) supports two primary communication modes: SSE (Server-Sent Events) mode and stdio (Standard Input/Output) mode
The MCP Server Trigger node in n8n currently only supports Server-Sent Events (SSE), and it is clearly marked as “not supporting stdio transmission”
Reason: SSE requires a persistent connection to push the streaming data generated by the model back to n8n in real time, and the trigger node of n8n itself exposes an HTTP URL externally; stdio is a local process input/output, and n8n’s cloud environment cannot directly map it to a public URL, so the official team simply did not implement it. Therefore, the following method is set up specifically for SSE. The specific process is as follows:
- Installing Cherry Studio and simple settings:
- www.cherry-ai.com/Enter the official website and click “Download” at the top to access the download page. From there, download and install the software according to your system

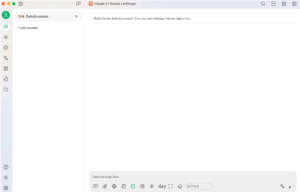
After installation, click the settings icon in the lower left corner, select “Model Service”, and then, based on the API you have purchased, click on the corresponding “Model Service Provider”. Enter the API key and save the model configuration

This allows for dialog interaction in the conversation interface
Before setting up the second step, you need to activate the workflow, as shown in the above figure
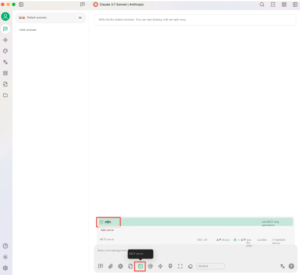
- Obtaining the MCP website URL and setting the password:
- Then, after importing the workflow for running video 31, click on the MCP server trigger node to obtain the URL and set the key, as shown in the figure:
III. Configure SSE mode MCP server
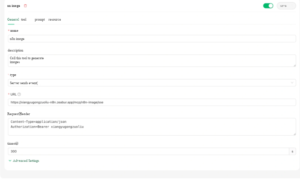
Create a new MCP server, open the Cherry Studio backend management interface, and access the “MCP Server” management page,
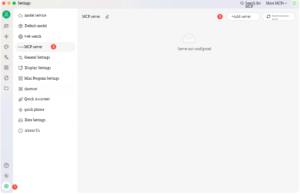
Fill in the MCP configuration item by item
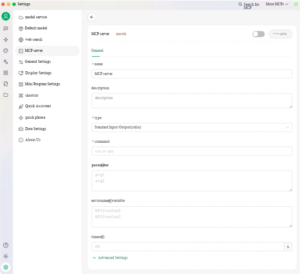
- Name
- Description (optional)
- Type
- URL
- Request headers (one per line)
- Timeout (seconds)Set to 300, suitable for SSE scenarios:
After checking and confirming there are no errors, click “Save”
- Configuration completed and saved. The complete configuration is as shown in the figure:
How to invoke after configuration is completed?
After completing the configuration, you can directly invoke the large model through the workflow or interface of Cherry Studio, selecting the newly configured MCP server, and engage in real-time data interaction with various external services
In this way, you no longer need to frequently modify code or repeatedly perform technical deployments. By focusing solely on the business process itself, you can easily achieve efficient workflow automation from idea to implementation
That’s all for today’s sharing by Xiangyu. Hurry up and give it a try! Enjoy the new experience of large model services with low thresholds and quick implementation! #n8nBasicTutorial