This tutorial to provide a clear and detailed guide for beginners, guiding you step by step on how to successfully configure and use Google’s Vertex AI service, especially the powerful Gemini module, in the n8n workflow automation platform
1. Analysis of core concepts
Firstly, if you find it troublesome to build your own system, you can easily use the official solution .Just Click here
Before starting the operation, let’s take a few minutes to understand three key concepts, which will help you better grasp the entire process.
![]() Google AI Studio:
Google AI Studio:
What is it? It’s a free, web-based tool, a “playground for AI models” provided by Google to developers.
What is it used for? You can quickly test and experience the latest Gemini model here, try different prompts, and observe the model’s output effects. It is ideal for rapid prototyping and creative ideation before integrating AI into complex processes.
Relationship with this tutorial: We will not directly connect AI Studio in n8n, but the prompts that you have successfully tested in AI Studio can be directly copied and used in the nodes of n8n.
![]() Vertex AI:
Vertex AI:
What is it? It’s an enterprise-level, comprehensive AI development platform provided by Google Cloud. If AI Studio is a playground, then Vertex AI is a professional “AI factory”.
What is it used for? It provides a series of services including model hosting, data management, model training, and large-scale deployment. All models available in Google AI Studio, such as Gemini, have corresponding versions in Vertex AI that can be used in production environments.
Relationship with this tutorial: n8n will directly connect with Vertex AI. It is through Vertex AI’s API that we can stably and reliably invoke the Gemini model in the automation process.
![]() Gemini:
Gemini:
What is it? It is the collective name for the latest and most powerful multimodal AI model family developed by Google. It can not only understand and generate text, but also handle images, audio, and video.
What are the versions? The Gemini family includes models of different sizes and purposes, such as the most powerful Gemini
1.5 Pro and the faster Gemini 1.5 Flash.
Relationship with this tutorial: Gemini is the “brain” we will be utilizing. We will issue commands to Vertex AI through n8n, and Vertex AI will then invoke the Gemini model to accomplish the tasks we specify (such as answering questions, generating text, etc.).
To summarize: We seek inspiration and test prompts in AI Studio, and then connect with Vertex AI in n8n
The platform utilizes the Gemini model’s capabilities to achieve automation.
II. Overview of steps:
Preparatory work (important prerequisite)
To use Vertex AI, you must first complete the basic setup on Google Cloud Platform (GCP) and bind a valid billing account.
Detailed environment configuration: It is recommended to refer to the “Hands-on Chinese Tutorial for Installing No-Code Architects Toolkit on Google Cloud Platform (GCP)”, which provides detailed step-by-step instructions with screenshots.
Tutorial link: https://xiangyugongzuoliu.com/google-cloud-nocode-architects-toolkit-guide-zh/
Settlement account/credit card issues: If you encounter difficulties when binding your credit card, you can refer to the following tutorial for solutions: Tutorial link: https://xiangyugongzuoliu.com/bingo-card-google-cloud-vps-guide-
for-beginners/
Vertex deployment process:
After completing the above preparations, you can start the following core docking process:
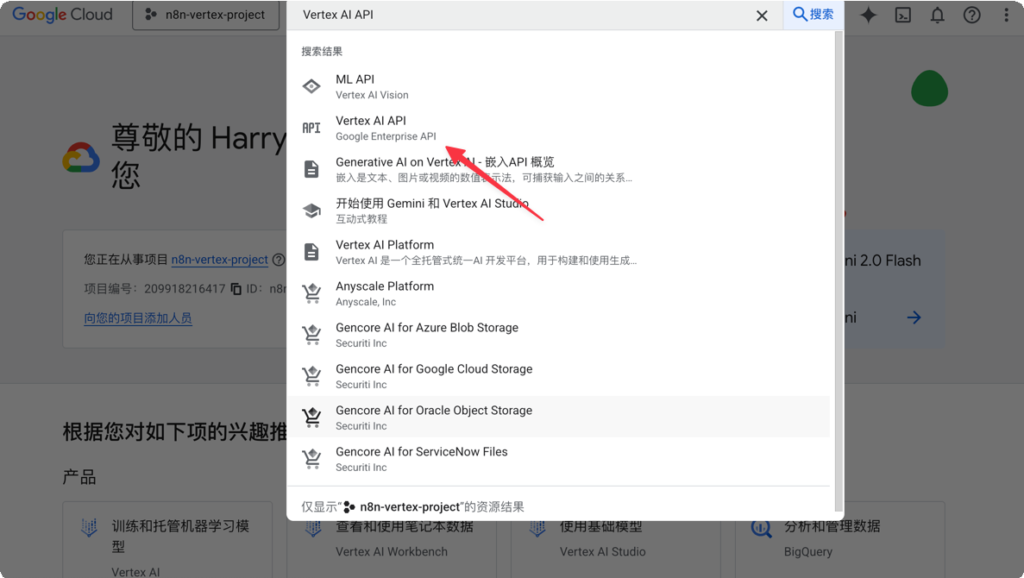
- Configure Google Cloud (GCP) environment. First, you need a Google Cloud account. After logging in, create a new project as your workspace, and then the most crucial step is to search for and enable the “Vertex AI API” service. This is equivalent to opening an official channel for subsequent communication between n8n and Google Cloud.
II. Obtain the “Passport” (Service Account Key) for n8n For security purposes, we do not directly use personal accounts. You need to create a dedicated “Service Account” for n8n in Google Cloud and grant it necessary permissions such as “Vertex AI User”. After successful creation, the system will prompt you to download a key file in JSON format. This file is the unique and secure credential for n8n to connect to your Google Cloud account. Please keep it safe.
III. Configure and use in n8n. Navigate to the “Credentials” section, select to add a credential of type “Google Service Account API”, and paste the information from the JSON file you just downloaded. After saving, in your workflow, whether you are using a simple AI Agent node or a more flexible HTTP Request node, you can directly select this credential to call Gemini, easily achieving various AI automation tasks.
III. Detailed process of vertex configuration
After configuring according to the method above, you can proceed to create a new project using the method below to start the configuration process for this tutorial:
Step 1: Create a Google Cloud project and associated billing account
1Log in to Google Cloud Console: Visit https://console.cloud.google.com/ and use your
Log in with Google account.
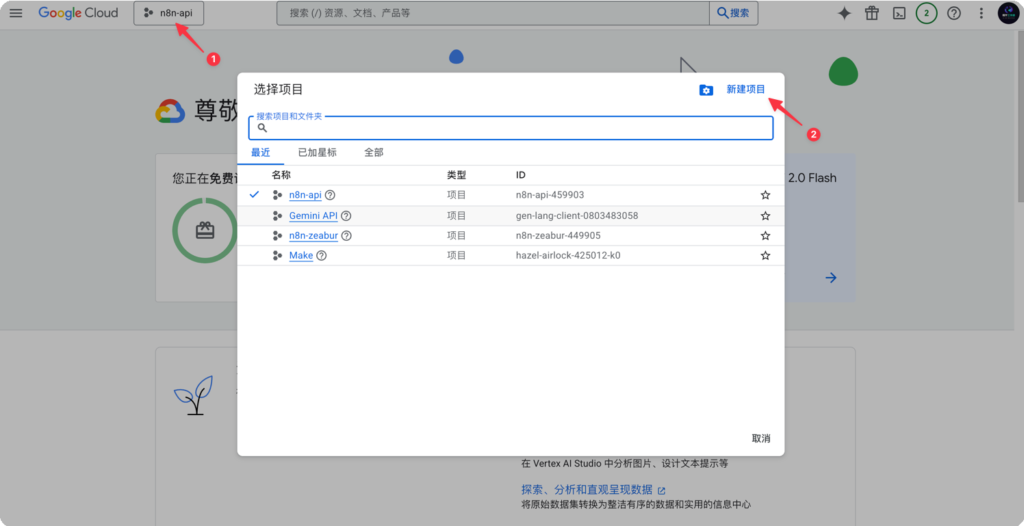
2Create a new project:
1Click on the project picker at the top of the page (usually displaying a project name or “Select a project”).
2In the pop-up dialog box, click “NEW PROJECT”.
3Enter a unique Project name for your project, such as n8n-vertex-project. Project ID
It will be generated automatically, or you can customize it.
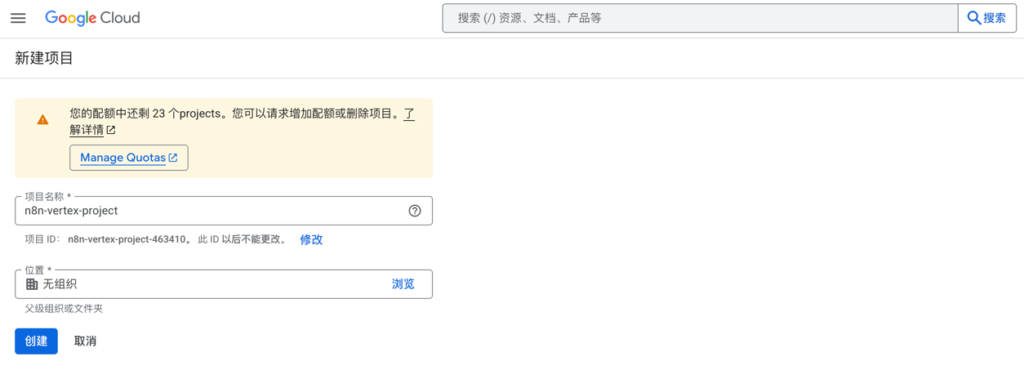
4Click “CREATE”.
3Associated settlement account (utilizing free bonuses):
1Projects are containers for resources, while billing is the method of paying for these resources. The two must be associated in order to be used
Services such as Vertex AI.
2The good news is that Google Cloud offers a free credit worth $300 to new users who register for the first time, which is usually valid for 90 days. This credit is sufficient for you to complete this tutorial and conduct extensive free exploration and experimentation.
3After creating a new project, the system will guide you to associate a billing account. If you don’t have one, please find “Billing” in the left navigation menu and set it up. This process requires binding a credit card for identity verification, but no charges will be made until the free credits are used up or expire.
4Important Note: To avoid unexpected charges, please be sure to proactively visit the Billing Account Management page to close your billing account before the credit is about to expire or be used up, or set strict budget reminders. Ensure that your project is linked to a billing account with an “Active” status before continuing.
5For credit card settings, if you don’t have a credit card, you can refer to this tutorial for guidance:
https://xiangyugongzuoliu.com/bingo-card-google-cloud-vps-guide-for- beginners/
Step 2: Enable the APIs required by the project
API (Application Programming Interface) is the “switch” that allows different software (such as n8n and Google Cloud) to communicate with each other. We need to manually turn on the switch for Vertex AI.
1 Ensure that you have selected the project you just created.
2 First, you need to enable the necessary permissions for the Vertex AI API, Cloud Resource Manager API, and Cloud Storage API. The specific steps are as follows.
3 Input Vertex AI API in the search bar at the top.
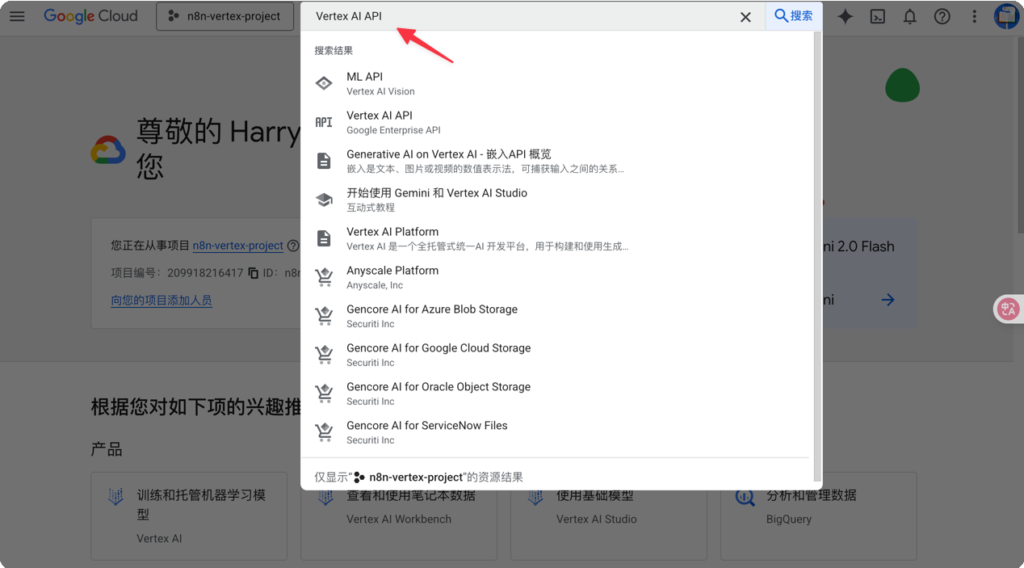
4 Click on “Vertex AI API” in the search results to enter its details page.
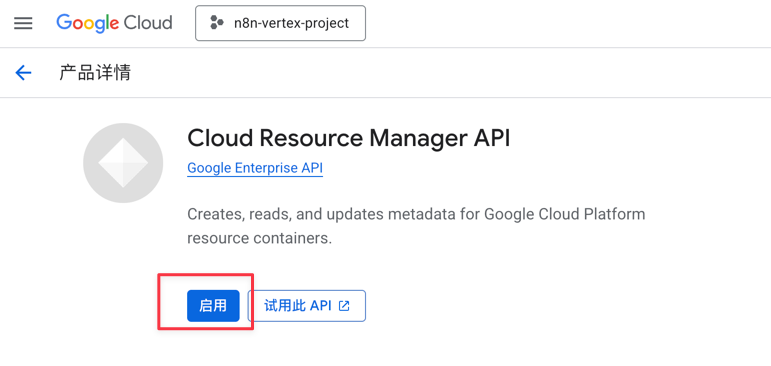
5 Enable Cloud Resource Manager API
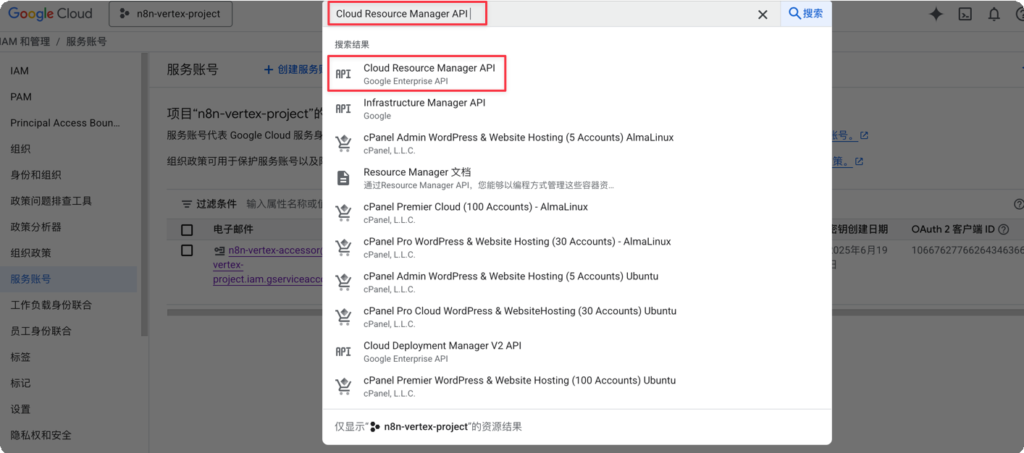
6 Click to enable Cloud Resource Manager API
7 Enable the Cloud Storage API using the same method
8 Click the blue ENABLE button. The system will take a minute or two to complete the activation process.
Step 3: Create a Service Account
The service account is the “robot identity” used by n8n to access your GCP resources. For security reasons, we do not directly use our own
Instead of using a Google account password, a dedicated “identity credential” with specific permissions is created for n8n.
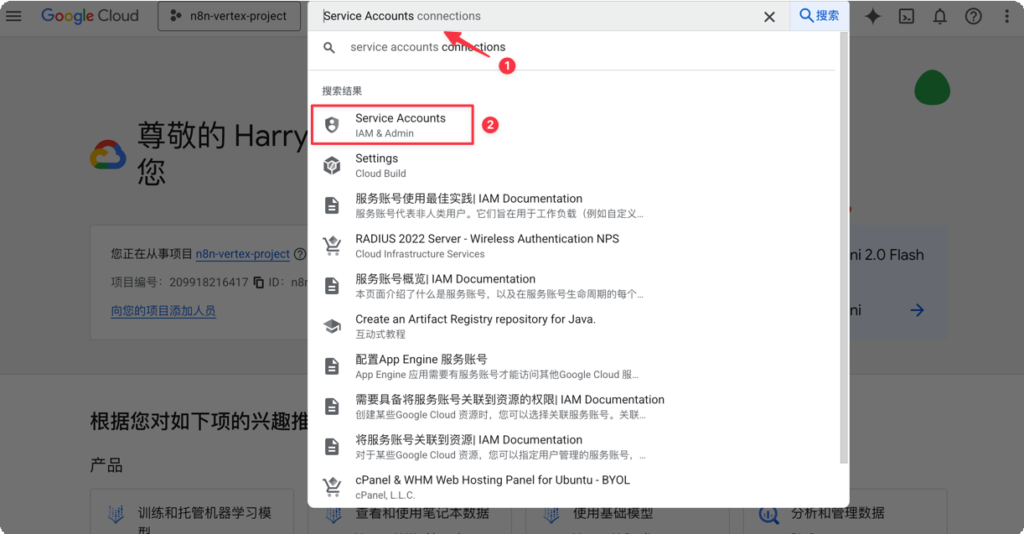
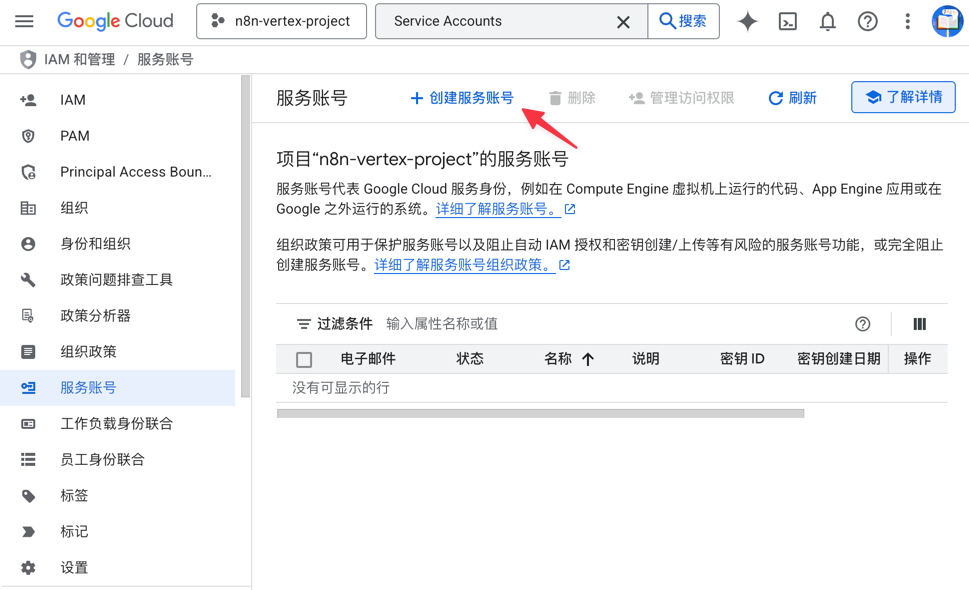
1 Search for “Service Accounts” in the top search bar and access the corresponding page.
2 Click+ CREATE SERVICE ACCOUNT.
3 Service account details page:
a input a Service account name,like n8n-vertex-accessor。
b The service account ID will be automatically populated.
c Click “Create” and continue.
4 Assign permissions:
1This is the most crucial step, namely “assigning permissions to the robot”.
2Click on the “Select a role” dropdown menu.
3Input “Vertex AI User” in the filter at the top and select it. This role grants the permission to perform AI inference
The necessary permission for (i.e., invoking the model).
5 Input “Owner” in the filter at the top and select it. This role grants the necessary permissions to perform AI inference, that is, to invoke the model.
6 Input “Storage Object Viewer” in the filter at the top and select it. This role grants the necessary permissions to perform AI inference (i.e., invoking the model).
7 I have granted all the following permissions. You can refer to the settings:
Step 4: Generate and download the service account key (JSON)
The key is the password for this “robot identity”, which is a file in JSON format.
1In the list of service accounts, locate the n8n-vertex-accessor account you just created, and click on its email address link.
2Enter the detail page of the service account and click on the “KEYS” tab at the top.
3Click “ADD KEY” → Create new key.
4In the pop-up window, ensure that the “Key type” is set to “JSON”.
5Click “CREATE”.
6The browser will automatically download a .json file immediately. Please save this file in a secure location, as it is the only credential for connecting n8n and GCP, and needs to be recreated if lost.
IV. Hands-on with n8n: Connecting and Testing Vertex AI
Now, let’s return to the n8n interface to complete the final connection.
Step 1: Create credentials in n8n
1Open n8n and click on “Credentials” in the left sidebar.
2Click “Add credential” in the top right corner.
3Input “google” in the search box, and then select “Google Service Account API”.
4The following configurations are set on the credential configuration page:
5Input the complete key value of the Private Key from the json file in the Private Key field, as shown in the figure.
6Turn on the “Set up for use in HTTP Request node” option. Meanwhile, enter the following URL:
https://www.googleapis.com/auth/cloud-platform
7Then click the “save” or “test” button in the top right corner. After that, the entire process will remain in the “test” state. You can wait for it to close automatically after 2 minutes. Select the “Close” button in the pop-up interface.
Step 2: Build your first Vertex AI workflow
1Create a new workflow (New).
2Input “AI” in the search box on the right side, drag the “AI Agent” node onto the canvas, and link the model to the Google Vertex Chat Model.
3Click on this node, and the configuration panel will pop up on the right side:
1Credential: Select the Google Service Account you just created from the dropdown list.
2Project: Please wait a moment, the project ID under your GCP account will be automatically loaded in the dropdown list. Select it.
3Model: Fill in the ID of the model you want to use, such as gemini-2.5-pro.
4In the Text input box, enter a greeting, such as “Hello, Gemini!”!.
5Click the “Execute Node” button located below the node.
6If everything goes smoothly, after a short wait, the OUTPUT area on the right will display the reply from Gemini. This proves that your n8n has successfully connected to Vertex AI!
Step 4: Call Vertex AI (Gemini) through the n8n HTTP request node
This tutorial will provide a detailed guide on how to configure n8n’s HTTP request node to interact with Google Cloud’s Vertex AI service. We will use the example of calling the powerful Gemini model and demonstrate how to configure detailed generation parameters.
This tutorial assumes that you have already added credentials using n8n’s Google Service Account method. The core of our workflow is the HTTP Request node, which is responsible for sending the actual request to the Vertex AI API.
Step 1: Configure the HTTP request node
Now we assume that you already have a valid access token, which allows you to construct HTTP requests to be sent to Vertex AI.
1In the workflow, add an HTTP Request node.
2Configuration node:
Method: POST
URL: This is the endpoint address for the Vertex AI API. It consists of several parts, and you need to replace the placeholders with your own information.
URL structure:
https://aiplatform.googleapis.com/v1/projects/{PROJECT_ID}/locations/{LOCATION
}/publishers/google/models/{MODEL_ID}:streamGenerateContent
Parameter description:
{PROJECT_ID}: Your Google Cloud project ID. For example, n8n-api-459903. You can obtain your project ID from the project homepage as shown below. Please refer to the latest page as Google’s pages may be revised at any time.
{LOCATION}: The region where your project is located, such as global.
{MODEL_ID}: The ID of the model you want to call. For gemini-2.5-pro, its API identifier is usually
gemini-2.5-pro.
The specific values can be viewed in Google’s Vertex through the following method:
Example URL: According to your request, the complete URL for invoking the gemini-2.5-pro model is as follows:
awk https://aiplatform.googleapis.com/v1/projects/n8n-api-459903/locations/global/publishers/google/models/g
Authentication: Select Predefined Credential Type.
Credential Type: Select Google Service Account API.
Google Service Account API: Select Google Service Account account.
Body Content Type: Select JSON.
Body: Here, we define the content to be sent to the Gemini model. This part includes the dialogue contents
and generation parameters (generationConfig).
prolog
{
“contents”: [
{
“role”: “user”, “parts”: [
{
“text”: “Please explain in detail what a Large Language Model (LLM) is and how it works based on your knowledge. “
}
]
}
],
“generationConfig”: { “temperature”: 1,
“topP”: 1,
“maxOutputTokens”: 65535,
“seed”: 0
}
}
Note:
The contents is an array that can support multiple rounds of dialogues.
The maximum value of maxOutputTokens depends on the specific model, and 65535 is a maximum value. You can modify the text value in parts to change your question.
Step 2: Execute Node: Click the “Execute Node” button on this node.
If everything goes smoothly, after the HTTP Request node is executed, you will see the return result from Vertex AI in the output panel. Since we are using the :streamGenerateContent endpoint, the result may be split into multiple parts. You can find the content generated by Gemini in the returned candidates -> content -> parts -> text.
The key lies in consulting the official API documentation of Google Cloud Vertex AI to identify the correct API endpoint and request method
(POST/GET) and the required Body structure.
The download link for this workflow is as follows: Download Link
Extraction code: 1KWa
V. Frequently Asked Questions and Tips (FAQ)
Common problems and solutions
During the configuration process of connecting n8n with Google Vertex AI (especially the Gemini model), you may encounter some common issues. This document aims to provide detailed troubleshooting steps and solutions to help you successfully complete the configuration.
Error 1: “No model found” or similar messages indicating that the model information cannot be found
This is the most common error, usually indicating that n8n has successfully connected to your Google Cloud project, but the AI model you specified cannot be found within the project. There may be four possible reasons for this:
Reason 1: Model ID error
Troubleshooting: Please carefully verify whether the model ID you entered in the n8n node is completely correct, including spelling, case, and connectors. For example, gemini-2.5-pro and gemini-2.5-flash are different models.
Suggestion: Copy the complete model ID directly from the official documentation of Google Cloud Vertex AI or the model list in the console to avoid manual input errors.
Reason 2: Regional mismatch
Troubleshooting: Not all models are available in all Google Cloud regions. If you do not specify a region in n8n or specify an incorrect region, you may not be able to find the model.
Suggestion: In the advanced options of the Vertex AI node in n8n, locate the Region field and explicitly fill in the region where the model is located. According to Xiangyu’s practice, for models such as Gemini, you can usually use “global” as the region directly. If “global” is not available, you can try specific regions such as “us-central1”. You can find the list of supported regions for specific models in the official documentation of Vertex AI.
Reason 3: Core API is not enabled
Troubleshooting: Ensure that you have enabled the “Vertex AI API” in your Google Cloud project. If the “toggle” for this service is turned off, any calls to the model will fail.
Suggestion: Return to the Google Cloud Console and confirm that the “Vertex AI API” is active in the “Enabled APIs and Services” section.
Reason 4: The project has not been bound to a valid settlement account
Troubleshooting: Calling the Vertex AI model is a paid service (even during the use of free credits). If your project is not associated with a valid and active billing account, Google will refuse to provide the service.
Suggestion: Visit the “Billing” section of Google Cloud to confirm that your project is linked to a valid billing account.
Error 2: “Cannot list projects”
When you cannot see your Google Cloud project list in the credential dropdown menu in n8n, it is usually a permission issue.
Reason: Insufficient permissions on the service account
Investigation: The root cause of this issue is almost always that the service account you created for n8n lacks the necessary permissions to “read” the project list under your account.
Suggestion:
1Navigate back to Google Cloud IAM & Admin -> Service Accounts.
2Locate the service account you created for n8n and edit its permissions.
3All permissions can be granted based on the image to avoid failures:
4Important note: After you add or modify permissions, it may take a few minutes for the system to fully apply the changes
It has fully taken effect. If you confirm that the permissions are correct but the issue persists, please wait patiently for 5-10 minutes and try again.
Error 3: Authentication failure of HTTP request node
When you opt to directly call the Vertex AI API using the more flexible HTTP Request node instead of the built-in AI node, you may encounter authentication errors (such as 401 or 403).
Reason: The credential is not configured for HTTP requests
Troubleshooting: By default, the created Google Service Account credentials may not be authorized for general HTTP requests.
Suggestion:
1In n8n, navigate to Credentials, locate and edit your Google Service Account credentials.
2Find and toggle the switch for the “Set up for use in HTTP Request node” option.
3In the Scopes input box that appears below, you must add the following URL as the permission scope:
https://www.googleapis.com/auth/cloud-platform
4Save the credential. After completing this configuration, the credential can correctly generate an authentication token for API calls in the HTTP Request node.
Error 4: Credential format error (Private Key is incorrectly filled in)
When creating a Google Service Account credential in n8n, the test connection fails or the credential is invalid.
Reason: Copied the wrong Private Key content
Troubleshooting: This is a very specific yet common error. Users are copying from the downloaded JSON key file
When it comes to “private_key”, what is copied is “private_key”: the internal content starts from —–BEGIN PRIVATE KEY—–
Be sure to ensure that the content from the beginning to the end is copied correctly.
Suggestion:
1Open your JSON key file with a text editor.
2Find the field named “private_key”.
3Only copy the “value” part of the field, which starts with —–BEGIN PRIVATE KEY and ends with –
—-END PRIVATE KEY \nThe complete text block ending here.
4Paste this part of plain text into the Private Key input box of the n8n credentials. Please note that this is different from directly using the entire JSON file as an environment variable in a cloud environment (such as Cloud Run)
Same.
Cost control and optimization techniques
Effective cost management is crucial for the long-term utilization of cloud services.
1Set budget and reminders
Operation: In Google Cloud, navigate to “Billing” -> “Budgets & Alerts” to create a budget for your project. You can set a monetary threshold (e.g. $10), and when the actual or forecasted expenses reach a specific percentage (such as 50%, 90%) of this threshold, the system will automatically send you an email alert. This can effectively prevent unexpected high expenses.
2Make full use of the free quota and use it in compliance
Strategy: Google Cloud offers a free credit of $300 for new users, which is an excellent opportunity for learning and experimentation. Please make full use of this credit (usually valid for 90 days) to test your workflow and evaluate the cost and performance of different models.
Important reminder: Please note that repeatedly obtaining free trial qualifications by registering multiple Google accounts and using the same payment method violates the Google Cloud service terms. Please use it according to your needs.
We hope this detailed guide can assist you in resolving any issues you may encounter and smoothly embark on your journey of AI automation!